Dimension Precision Select COPYTE: November 2011

Senin, 28 November 2011

Download Windows XP Fire 2011

Free Download Windows XP Fire 2011. Evolusi terbaru dari windows xp yakni Windows XP Fire 2011. Pada windows XP Fire 2011 ini telah ditambahkan beberapa kelebihan kelebihan fitur tambahan yang tentunya lebih keren dan canggih dibandingkan dengan fitur Windows XP sp2 , windows xp sp3 atau windows xp versi sebelumnya. Nah jika sobat masih belum mengetahui kelebihan kelebihan fitur windows xp fire 2011 ini, silahkan disimak dibawah ini :
Integrated Windows XP Fire 2011
Windows Media Player 11
Internet Explorer 8
Winrar 4.1
Microsoft Silverlight 4.0.60531.0
Flash Player AiO
DirectX9 Last Version
RocketDock
Including the software Windows XP Fire 2011
AIMP3
BM Radio 4
Firefox 5
Foxit Reader 5
Flash Player 9
Internet Download Manager 6.06
IrfanView 4.30
K-Lite Mega Codec Pack 6.1.0
kmplayer 3.0
Revo Uninstaller 1.92
UltraISO 9,36
Windows Live Messenger 2009
Yahoo Messenger 11
And also integrated with all the definitions of the network (LAN) and all
SATA definitions and the latest updates to June 2011
The version contains many of the themes, backgrounds, and elegant lines
There is also a MINI XP with the version of the emergency and many of the maintenance programs
Download Windows XP Fire 2011
Itulah sedikit Review Windows XP Fire 2011 Terbaru. Untuk Download Windows XP Fire 2011 Gratis dari Blogger Tuban, silahkan sobat copy link Mediafire dibawah ini dan download Windows XP Fire 2011 gratis :
Windows XP Fire 2011.Part1 : http://adf.ly/241St
Windows XP Fire 2011.Part2 : http://adf.ly/241TQ
Windows XP Fire 2011.Part3 : http://adf.ly/241Ts
Windows XP Fire 2011.Part4 : http://adf.ly/241UU
Password Mediafire Download Windows XP Fire 2011 Terbaru Gratis yaitu : freesoft88 . Good Luck!

Download Fruity Loops 10 Full Version Plus Crack


Untuk anda yang berprofesi atau hobi dengan digital music editing dan mixing khususnya yang menggunakan software fruity loops, sekarang telah hadir software fruity loops versi terbaru yang merupakan penyempurna dari versi-versi sebelumnya.
Pada artikel sebelumnya yang menyediakan link download untuk Fruity Loops 9 yang sudah termasuk crack, kali ini fruity loops sudah memiliki versi terbarunya yaitu Fruity Loops versi 10. Apa dan bagaimana software versi terbaru Fruity Loops ini? Saya akan berkan plugin-plugin terbarunya antara lain:

  1. Newtone (Demo) - is a pitch-correction and time manipulation editor. Slice, correct, edit vocals, instrumentals and other recordings.
  2. Pitcher (Demo) - is a real-time pitch-correction, manipulation &harmonization plugin that can correct and create 4 voice harmonies under MIDI control from a keyboard or the Piano roll.
  3. Patcher (Free) - Chain effects and or plugins to create complete chains that can be quickly loaded in new projects.
  4. ZGameEditor Visualizer (Free) - Visualization effect plugin with movie render capability based on the free.
 (Source: FL Studio Website)

Untuk download software Fruity Loops 10 yang sudah termasuk Crack (Crack Include) bisa anda gunakan link dibawah ini.

Download Fruity Loops 10 Crack Only (It Work, Tested!)
Download Fruity Loops 10 Software (From FL Studio Official Site)

Selasa, 22 November 2011

Cara Menghapus Virus Facebook | Aplikasi


virus facebook np  Cara Menghapus Virus Facebook | Aplikasi
Akhir-akhir ini saya terkena virus facebook.bikiin bete aja tuch virus. setelah otak atik akhirnya saya menemukan cara menghapus virus facebook itu.susah juga sich menghapus virus facebook itu,tapi ga terlalu sulit kok…..hehehehehheh.
Virus facebook? Memangnya facebook bisa kena virus?
Yang dimaksud virus disini aplikasi yang didevelop dengan maksud jahat dan tidak bertanggung jawab. Pernahkah sobat menggunakan aplikasi yang beriming-iming dapat melihat orang yang mengunjungi profil, gambar-gambar XXX, cerita guru yang jahat, dan berbagai aplikasi tidak jelas jelas lainnya? Awas! bisa-bisa itu virus!
Kali ini ditagiri akan membahas pencegahan virus facebook dan cara menghilangkannya
Ciri-ciri
Aplikasi facebook yang jahat biasanya sangat persuasif dengan tujuan yang
tidak konkrit.
Oh well, masih ingat kan di friendster sobat bisa melihat orang yang melihat-lihat profil kita? (uhuk, bila sobat pernah memakai friendster icon biggrin Cara Menghapus Virus Facebook | Aplikasi ). Di Facebook tidak ada cara mendapatkan hal tersebut loh. Mungkin karena rasa penasaran, jadi orang serta merta mengkliknya. Ckck..
Aplikasi yang berbahaya juga melakukan posting secara brutal kepada teman-teman yang ada di akun facebook tersebut. Biasanya berupa post ke wall dan memberikan link aplikasi tersebut untuk di sebarkan ke orang-orang berikutnya. Yang berbahaya link yang diberikan dapat berupa alamat website yang mengarah ke trojan, spyware, hingga pencurian password. Bahkan sekarang aplikasi jahat facebook ada yang bisa melakukan post di chat. Hati-hati saat membuka link
Pencegahan
Sebelum menggunakan aplikasi facebook, pastikan bahwa aplikasi tersebut valid dan dari developer terpercaya, sebagai contoh Zynga sudah tidak diragukan lagi ke-validan-nya.
Sebelum menggunakan aplikasi sobat bisa membuka page dari aplikasi tersebut. Biasanya alamat dari page aplikasi tersebut apps.facebook.com/namaaplikasinya Sobat bisa mengecek komentar-komentar di wall aplikasi tersebut. Apakah banyak yang merasa puas? Apakah banyak yang mengatakan HOAX?
Saat akan konfirmasi penggunaan aplikasi tersebut cek data-data yang akan digunakannya. Apakah akan menggunakan hak akses post dan wall? Apakah akan menggunakan list teman? Apakah akan menggunakan galeri foto? Perhatikan hal-hal tersebut dan apakah relevan dengan fungsi aplikasi itu sebenarnya. Sebagai contoh aplikasi kalkulator terasa janggal bila memerlukan akses foto.
Tapi saya sudah menggunakan aplikasi tersebut?
Dan saatnya sobat menghilangkannya!
  1. Pada facebook, klik Account… Privacy Settings
    Screen+shot+2011 03 14+at+11.50.11+PM Cara Menghapus Virus Facebook | Aplikasi
  2. Di bagian kiri bawah, Apps, games and websites, klik Edit your settingsScreen+shot+2011 03 14+at+11.50.20+PM Cara Menghapus Virus Facebook | Aplikasi
  3. Pada bagian aplikasi yang sobat gunakan (Apps you use), klik Edit SettingsScreen+shot+2011 03 14+at+11.51.32+PM Cara Menghapus Virus Facebook | Aplikasi
  4. Cari nama aplikasi yang ingin dihentikan penggunaannya dan klik tanda x (silang) untuk menghapus aplikasi tersebutScreen+shot+2011 03 14+at+11.52.50+PM Cara Menghapus Virus Facebook | Aplikasi
Bila sobat tidak menemukan aplikasi yang dicari bisa juga dengan mengunjungi alamat aplikasi tersebut dan klik link untuk menghapuskan aplikasi tersebut
Screen+shot+2011 03 15+at+12.32.06+AM Cara Menghapus Virus Facebook | Aplikasi
Semoga bermanfaat. ……Jadilah pengguna Facebook yang cerdas dan waspada! icon smile Cara Menghapus Virus Facebook | Aplikasi

Minggu, 20 November 2011

My Artwork

Crayon Art
T-Shirt Art
Easy Listening

How to Make a Melting Camera Scene

Take a look at the image we’ll be creating. Want access to the full PSD files and downloadable copies of every tutorial, including this one? Join Psd Plus for just $9/month. You can view the final image preview below.
  • Program: Adobe Photoshop CS4
  • Difficulty: Intermediate
  • Estimated Completion Time: 2 – 2.5h

Step 1

Open the camera file by 
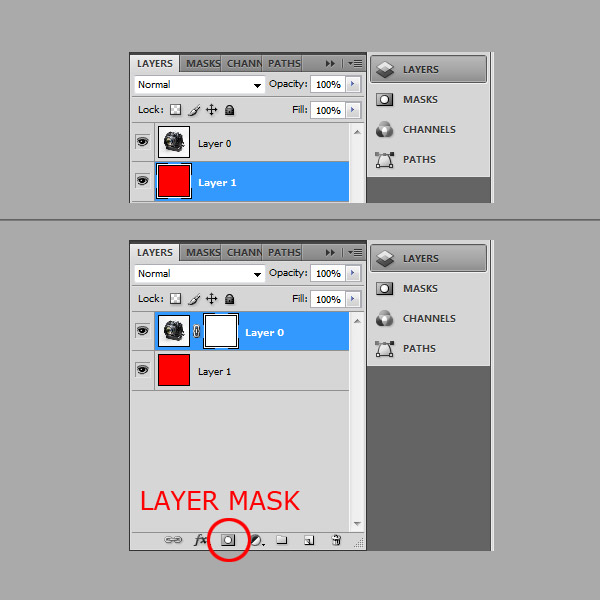
bennorz, double-click on the layer to unlock it and create a new one beneath. Fill the new layer with a red (#ff0000) color. Now you have a red background beneath the camera layer and it makes it easy to see borders of the object when masking. It is not necessary to use red, but it is better to use a color which is not in the object.
Apply a layer mask to the camera layer. Be sure to have it selected when masking.

Step 2

Masking is the non-destructive way of removing parts of the image especially the background. That’s because erasing is done on the mask not on the image so you can create a mask and then delete it and the image stays untouched. Other great things of masks are that you can use a variety of tools to create it such as the Pen Tool or brush.
This time we will use the brush technique. Select the Brush Tool and set its Hardness to 93% – a mostly hard brush creates better borders on objects. Now we are ready to start masking.

Step 3

You can start whenever you want in the image, just bear in mind that if you use a "Black color" the brush will start erasing the image and if you use a "White color" or eraser (E) the image will start appearing back.
So mask everything except the camera – just paint around the camera, zoom in and out and resize the brush to get the adequate effect. Pay more attention to corners – the most critical ones are shown in white circles below. Here you should be most precise. It may take you some time practicing before you are used to it.

Step 4

Create a new document that is 1600 px wide and 1200 px high at a resolution of 72 pixels/inch and fill the "Background" layer with a gray (#dfdfdf) color. Put the masked camera image into this document. If you have the document with the camera still open, then you can just drag it with the Move Tool (V). It will create a new layer with the camera in the workspace. There is still the mask which we won’t need to edit so right-click on it and choose Rasterize Layer.

Step 5

Now we have the camera ready. So duplicate the layer, then resize it as shown below.

Step 6

Now it’s time for the Liquify filter. You can find it in Filter > Liquify filter (Shift+ Command + X). Then just drag parts of the camera image the way the arrows show. Bear in mind that the camera is laying on the plane and the effect should have a little perspective so you have to play with the technique a little bit to get adequate results.

Step 7

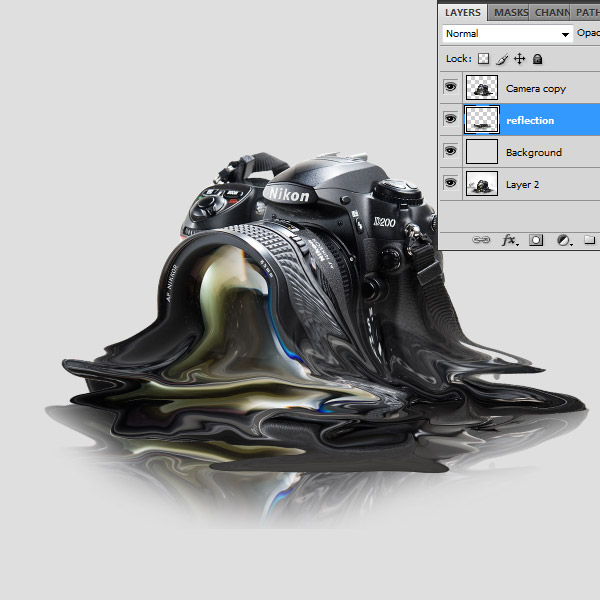
Grab the Eraser Tool (E) and set the Hardness to 0%, then select the “camera” layer, not the melted one. Now erase it to almost fit the melted copy. Then select both layers, the not melted and the melted ones, then merge them. You can merge layers by selecting them and press Command + E.


Step 8

Now open the Liquify filter and polish the melting effect on the merged image. Then duplicate the layer and move it to the bottom, just above the background layer. Then go to Edit Menu > Transform > Flip Vertical, and adjust the position of the result.

Step 9

Now we are going to create the ice plane. Just open the tiles photo and put it into the scene. Scale it by going to Edit > Transform > Scale (Command + T). Now drag the corner with the while holding Shift to fit the document width, and then duplicate the layer. These two layer should be arranged at the bottom of the scene just above the “Background” layer. Arrange the duplicated layer to the top-left corner as shown below.

Step 10

Merge the two plane layers. Decide where is the horizon line and delete the remaining part of the image above it. Then grab the 300px Brush Tool with Hardness set to 0 and delete the border of the image to create a blurred effect. Then set the Opacity of the layer to 25%.

Step 11

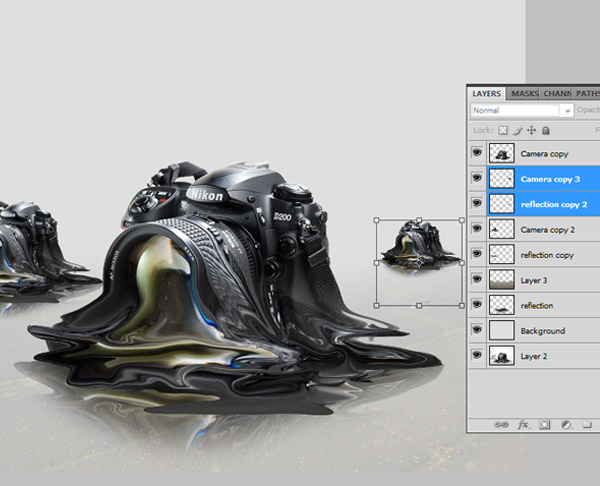
Now select the layers of the camera and its reflection and merge them. Then create one more duplicate of the result layer. Drag these two copies of the camera to the exact positions and resize them to create the illusion of space.
The layers of the cameras should be behind each other in size and ordered from larger to smaller. Create a new layer just beneath the layer with the largest camera. Then grab the Brush Tool and set the Hardness to 0. Select 100% white and play around with Brush sizes to draw fog around the cameras. The simple rule is to avoid the tendency to cover the whole space with white.
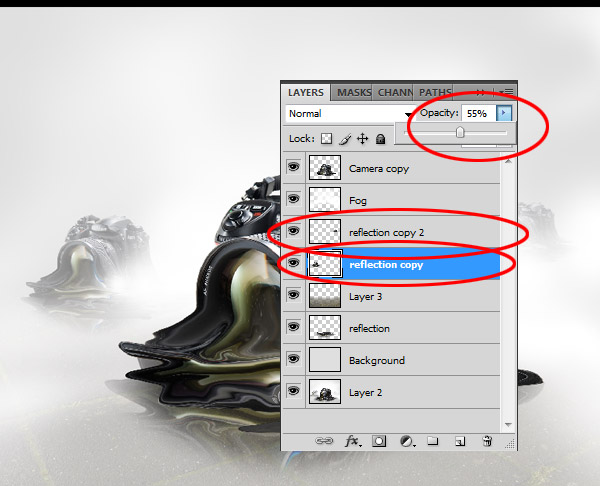
Step 12

To create more illusion of space the cameras should be disappearing a bit, so set the Opacity of the smallest one to 25% and 55% for the middle one.

Step 13

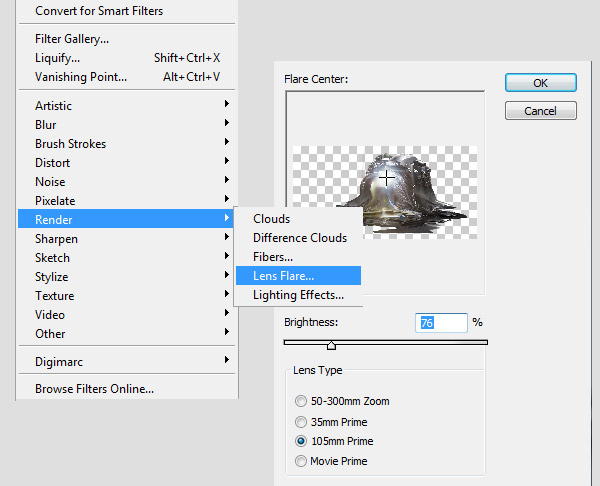
Now we bring some light into the image. Select the largest camera layer. Go to Filter > Render > Lens Flare, and choose the 105mm Prime with 76% Brightness. Then adjust the position of the reflection to the top of the lens.

Step 14

Now we are almost finished. We can also add some scratches to the ice plane. Grab a 1px size Brush and set a white color for it.
If you think the scene needs more realism, then you can add some shadow beneath the largest camera layer. Create a new layer and draw the shadow with a black color. Now adjust the Opacity or set the layer style to Overlay.

Conclusion

Now we have finished the illustration of a melting camera. You can add some typography to it and get to create a really nice camera ad or use it as is.

Tutorials Photoshop

Making of the Imaginary Paint Dancers 


Create a document of size 595×842 pixels with black background. Create a new layer and name it as "Grey Spot". Using a Brush tool, Soft Rounded 600px and color #333333, paint a huge grey dot at the center of the document.
Using the same method above, paint a few more spots with your preferred colors like the example below.
Download a cool texture from KrakoGraff. Place the texture above all the color spots you done earlier. Go to Image > Adjustments > Desaturate. Set the Blend Mode of this layer to Overlay.
Download Paint Bottle from SXC.hu. Crop out the bottles and place it in the middle as shown below.
Make a new layer below the bottles and name it as "Shadows". Paint the bottles’ shadows with the Brush tool.
Download Paint Tossing Pack from Media Militia. This is a fantasic set of stocks that you gonna love it. Choose one of the paint image like the one I got below. Select a small white area in the image. Go to Select > Similar to select all the other white areas. Press Delete to remove the white background.
Go to Image > Adjustments > Hue/Saturation. Check on Colorize and change the paint splash to red color. Right-click on the layer and choose Blending Options. Select Inner Glow and input the following settings.
Make a few more paint splashes to the top of each paint bottle using the method above.
Download Zentai image from Mjranum Stock. There is a series of these images that we have to thank Marcus for sharing with us. Crop the figure out from the background.
Go to Image > Adjustments > Hue/Saturation. Check on Colorize and change the figure to blue color.
Go to Filter > Artistic > Plastic Wrap. Apply the following settings to the image.
Resize the dancing figure to fit in the blue paint splash. Using the Eraser tool, fade the bottom of the figure like the example below.
Repeat the steps for a few more dancing figures that you can find from the Mjranum’s deviantART gallery.
Create a new layer and name it as "Glows". Using the Brush tool, Soft Rounded 50px and white color, paint a small dot at the lid of one paint bottle.
Repeat the same for the lids of all paint bottles.
Download the High Res Ink Splatter Brushes from Muzika08. Paint a few small splatter at the glowing spots with white color.
Download the Smoke Pack from Media Militia. Create a new layer behind the paint bottles and name it as "Smoke". Paint a few white smoke with the brushes you downloaded. Set the Opacity of this layer to 40%.
Create a new layer behind the "Smoke" layer and name it as "Scribbles". Using the Brush tool, Soft Rounded 2px and white color, scribble some stuffs randomly around the document area.
Resize it smaller and place it just behind the dancing figures. Right-click on this layer and choose Blending Options. Select Outer Glow and apply the following settings.
Duplicate a few of the "Scribble" layers, make them smaller and position randomly around the dancing figures.
Create a new layer and name it as "Glowing Lines". Using the Pen tool, draw a curve as shown below. Right-click on the path and choose Stroke Path. Check on Simulate Pressure and hit OK. Right-click on the layer and choose Blending Options. Choose Outer Glow and leave the settings as default.
Make a Photo Filter Adjustment Layer at the top of all layers. Choose Cooling Filter (82) and density to be 25%.
Make a Levels Adjustment Layer and set the settings as 0, 0.70, 255.
And there you are! The work is done! Hope you enjoyed the tutorial and wish everyone have a great weekend. Cheers~